Now that I’ve fully unlocked my Defcon 20 badge, I’m a little bit sad I can’t redo the whole sequence… or can I?
A lot of the firmware and sample code out there are written in the Spin language. This is designed to make multi-core embedded development super easy. Spin Language FAQ
If you were developing something like a robot with various sensors this language would easily allow you to delegate specific pins for input/output to each of the cores or “Cogs” and focus each on a single task. It would help keep latency low and make it more accessible to someone learning hardware and not OS fundamentals.
This particular chip is the P1(P8X32A) it uses Spin1 language as well as C, assembly and others both open source and commercial. List of dev tools for P1/P2 chips You basically want to skim the list for P1 and your OS of choice as well as your language target to find your sweet spot.
You’ll end up hitting archive.org a lot to find many of the pages related to this badge, one of the best is still at the original Parallax forums badge announcment also the Defcon 20 Badge hacking discussion.
Repairing ancient Parallax forum links
The Parallax discussion form had a redesign at some point so here's how to re-work the URL and find the new location: Example:https://forums.parallax.com/showthread.php?141494-Article-Parallax-Propeller-on-DEF-CON-20-Badge-Start-Here!
Replace "showthread.php?" with a "discussion/" then the dash after the article number should also be a "/" resulting in:
https://forums.parallax.com/discussion/141494/Article-Parallax-Propeller-on-DEF-CON-20-Badge-Start-Here
Same for the hacking discussion:
https://forums.parallax.com/showthread.php/141567-How-did-you-hack-your-DEF-CON-20-Badge
Becomes:
https://forums.parallax.com/discussion/141567/How-did-you-hack-your-DEF-CON-20-Badge
That way you won't have to deal with broken links in the internet archive.Alright 8-core, 32-bit low-power processor, very cool. Especially way back in 2012.
First I ran into the BadgeUtil project and took a look at that Spin code. I also looked around at the official Firmware code released by Defcon/1o57. Getting my head around the Propeller Spin language and how i2c and EEPROMs work I was able to put together my own badge progress tool.
Some cool things I learned from playing with the firmware and BadgeUtil code.
You need external clock sync
If you’re going to interface with the outside world, you need a synchronized clock. In this case you need to set clock mode like _CLKMODE = XTAL1 + PLL16X or similar, this ensures the internal timing and the external timing match up. Otherwise the serial communications will be garbled and not actually match the baud rate expected.
The EEPROM on this board is using i2c communications
… that means it’s sending a signal over the wire to the chip using it’s own protocol. The EEPROM libraries add little delays after sending the read and write signals to ensure enough time has passed, both that the write has completed, and that the i2c comms aren’t being saturated.
The LEDs are using PWM (Pulse Width Modulation) to control their brightness.
This basically means using a flickering pattern fast enough to be invisible to the human eye. This is used in digital circuits to divide the amount of power used to drive an LED by setting a bit pattern that breaks it into a known percentage.
For example let’s say it’s an 8-bit PWM sequence, a value of 15 would be in binary 11111111 which is always on. This would be 100% brightness. Setting the value to 14 however would result in a continuous pattern of 11111110 with each 0 bit decreasing the brightness by 12.5% so 87.5% brightness, 75% brightness, and so on.
Now driving this pattern continously would require a single-core processor with a single thread to run in a loop and carefully control timing while turning the LED pin on and off. However some chipsets have built in PWM capabilities. Reading the jm_pwm8.spin object code from the Badge firmware I can see that the task of handling the PWM is being delegated to a Parallax cog, additionally each cog appears to have 2 dedicated PWM channels (forum disccusion). What’s great about this is you can drive several LEDs and control the brightness without the need of several PWM chips (like an LED rope has at regular intervals) and by placing task on the cogs your main thread can focus on it’s logic instead of handling LEDs.
And so then………

![]()
Putting together the pieces I’ve made a small tool for individually writing the EEPROM values for each badge type. The 8 LEDs on the badge reflect the current value in the EEPROM for that badge type and is updated as you modify their values. Press digits 0-7 to toggle each badge between 0x00 and 0xFF, then ‘9’ to restart from the flash.
I’ve set the LED brightness WAY down because the default LEDs are hecka bright and give me a headache. But if you’d really rather blind yourself change LED_BRIGHTNESS = 48 back to 255.
I’ve set the serial interface speed to 57600 baud, this matches the official firmware and makes it easy to test changes by pressing ‘9’ to exit or just using the button on the badge. Otherwise if it’s using the default of 9600 or whatever you end up constantly resetting the terminal and the badge when it garbles. Set your serial output speed consistently to save headaches.
Run this from Spin Tools or similar using the RAM load NOT flash.
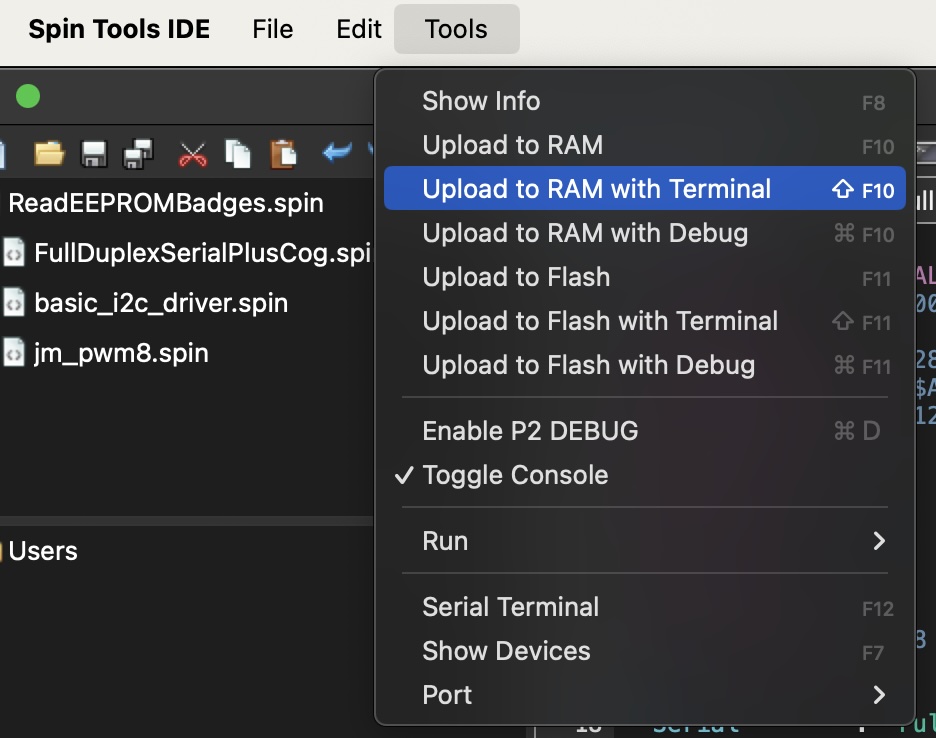 This let’s you easily do a test/reboot loop and see the immediate changes to the badge output. At the conference a few people bricked their badges by accidentally pressing F11 instead of F10 so don’t join that club.
I grabbed some objects from BadgeUtil and the firmware, be sure you have a copy of basic_i2c_driver.spin and FullDuplexSerialPlusCog.spin from BadgeUtil/firmware/ and also jm_pwm8.spin from the offical badge code all in the same location for the object/library files to be included.
Here’s SetEEPROMBadges.spin
'' SetEEPROMBadges.spin v1.0

CON
  _CLKMODE      = XTAL1 + PLL16X
  _XINFREQ      = 5_000_000

  EEPROM_SCL      = 28
  EEPROM_DEVID    = $A0
  EEPROM_PAGESIZE = 128

  I2C_SCL                       = 28
  EEPROMAddr                    = %1010_0000
  NVSTATUS  = $7F00

  debugMode     = 1
  LED1 = 16
  LED_BRIGHTNESS = 48

OBJ
  Serial        : "FullDuplexSerialPlusCog"
  i2c           : "basic_i2c_driver"
  leds          : "jm_pwm8"                 ' led modulation    *

VAR
  byte whichBadge, eepOffset, gotByte

PUB main
  Serial.start(31, 30, 0, 57600, 2)
  leds.start(8, LED1)                                           ' start led driver
  i2c.Initialize(I2C_SCL)

  Serial.str(string("Reading EEPROM!"))  ' Send the debug message
  serial.tx(13)

  repeat
    showStats()
    Serial.str("0-7 to toggle, 9 to exit: ")

    whichBadge := Serial.rx

    Serial.tx(whichBadge) ' ASCII digit
    Serial.tx(13)

    case whichBadge
        "0".."7":
            flipBadge(whichBadge)
        "8":
            Serial.str("No.")
        "9":
            Serial.str("Exit... rebooting.... ")
            waitcnt(cnt + clkfreq * 3)
            reboot
        other:
            Serial.str("Don't be silly")

   Serial.tx(13)


PUB flipBadge(badgeIndex)
    eepOffset := badgeIndex - "0"  ' char range verified before calling
    gotByte := i2c.ReadByte(I2C_SCL,EEPROMAddr, NVSTATUS+eepOffset)
    gotByte := gotByte ^ $FF
    i2c.WriteByte(I2C_SCL,EEPROMAddr, NVSTATUS+eepOffset,gotByte)      ' Write flipped byte

PUB showStats
    repeat eepOffset from 0 to 7
        badgeName(eepOffset)
        gotByte := i2c.ReadByte(I2C_SCL,EEPROMAddr, NVSTATUS+eepOffset)
        serial.hex(gotByte,2)
        serial.tx(13)
        if gotByte == $FF
            leds.set(eepOffset,LED_BRIGHTNESS)
        else
            leds.set(eepOffset,0)

PUB badgeName(badgeNum)
    case badgeNum
        0: Serial.str("[0] Human ... ")
        1: Serial.str("[1] Artist .. ")
        2: Serial.str("[2] Press ... ")
        3: Serial.str("[3] Speaker . ")
        4: Serial.str("[4] Vendor .. ")
        5: Serial.str("[5] Contest . ")
        6: Serial.str("[6] Goon .... ")
        7: Serial.str("[7] Uber .... ")